9 - UI
We've got a basic game world, but we need to make information about this world available to the player. For now, let's start by shrinking the existing generated map to give us a bit of room for a UI.
// src/app.ts
//...

const MAP_WIDTH = 80; // Add some new constants
const MAP_HEIGHT = 43; // We'll change 50 -> 43 for now

export enum GameState {
  INIT,
  PLAYER_TURN,
  ENEMY_TURN,
}

export class Game {
  input = new Input.KeyboardHandler();
  terminal = this.createTerminal();
  lastTime = performance.now();
  world = new World();
  player: Entity;
  gameState = GameState.INIT;
  map = GameMap.GenMapRoomsAndCorridors(MAP_WIDTH, MAP_HEIGHT); // Use the constants to make the map
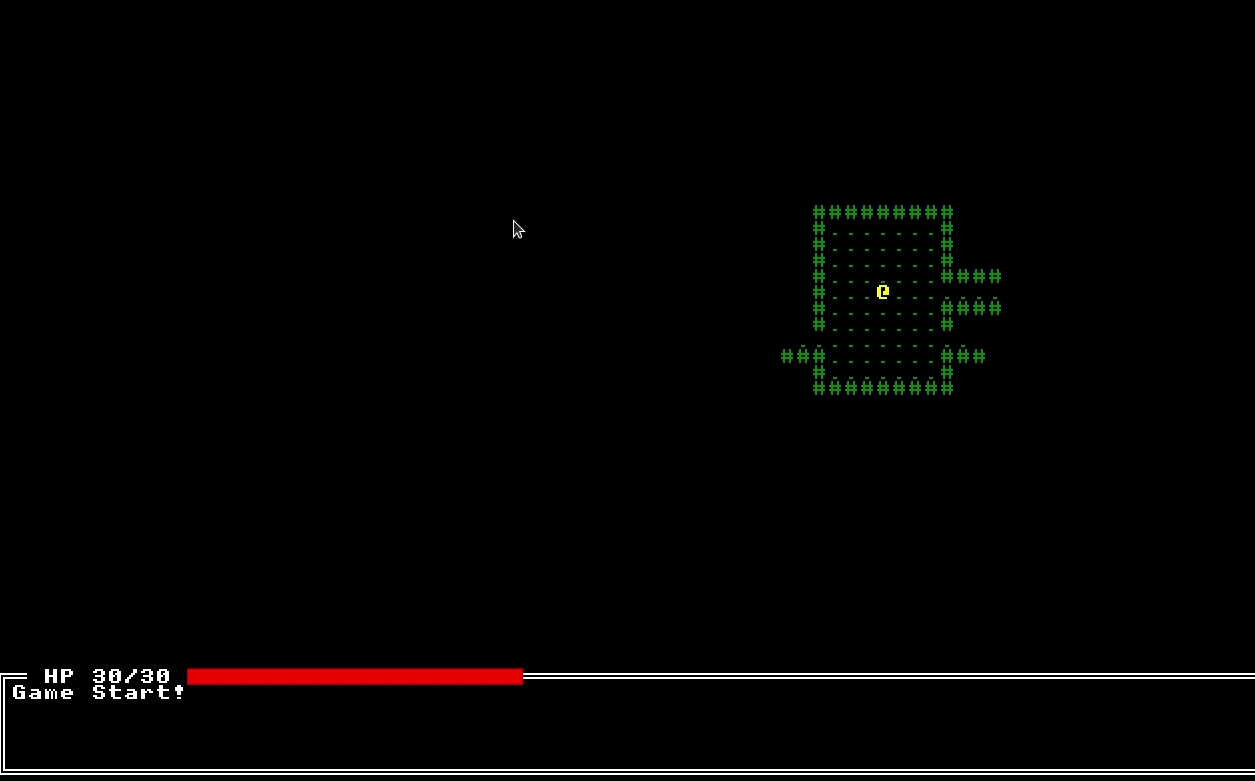
From there we need to update the render system a bit to add some UI elements. We're going to use Malwoden's GUI package for this. We could always draw to the terminal like we have been up to this point, but Malwoden provides a number of Widgets that can help draw common elements to the screen. Some of the widgets inside the GUI package include:
ContainerWidget- Groups other widgetsPanelWidget- Draws a panel on the screen of width/height, with an optional boarder.TextWidget- Draws text to the screen, and can provide basic text wrappingBarWidget- Used for loading/progress/hp style bars.
You can also create your own custom widgets by extending Malwoden's Widget class, though we won't have to worry about that for now. Instead, we're going to use Widgets to make something that looks like below.

To make this, we're going to take advantage of the Widget's children/parent system. By adding children to a Widget, it will change where the 'start' position of the child is to help keep widgets grouped if a parent moves. Our widget tree will look like this
- ContainerWidget
- PanelWidget
- TextWidget
- BarWidget
- PanelWidget
Let's get started in the RenderSystem.
// src/systems/render.ts
import { Terminal, Color, GUI } from "malwoden"; // Import the GUI package

//...
export class RenderSystem extends System {
  game: Game;
  gui: GUI.Widget; // Add a new gui field to store the root of our Widget tree

  constructor(world: World, game: Game) {
    super(world, game);
    this.game = game;
    this.gui = this.constructGUI(game); // We'll create the widgets in a dedicated method
  }

//...
constructGUI(game: Game): GUI.ContainerWidget {
    const container = new GUI.ContainerWidget()
      .setTerminal(game.terminal); // Make sure we set a terminal at the root!

    const panelWidget = new GUI.PanelWidget({
      origin: { x: 0, y: 43 },
      initialState: {
        width: 80,
        height: 7,
        borderStyle: "double-bar",
      },
    }).setParent(container); // Make sure we set the parent widgets!

    const textWidget = new GUI.TextWidget({
      origin: { x: 3, y: 0 }, // This will be relative to the *parent*
      initialState: { text: " HP 30/30 " },
    }).setParent(panelWidget);

    const barWidget = new GUI.BarWidget({
      origin: { x: 15, y: 0 },
      initialState: {
        width: 15,
        maxValue: 100,
        foreGlyph: Glyph.fromCharCode(
          CharCode.blackSquare,
          Color.Red,
          Color.Red
        ),
        backGlyph: Glyph.fromCharCode(
          CharCode.blackSquare,
          Color.DarkRed,
          Color.DarkRed
        ),
      },
    }).setParent(panelWidget);

    return container;
  }

// ...
  execute() {
    const { results } = this.queries.renderables;

    this.game.terminal.clear();
    this.gui.cascadeDraw(); // Tell the gui to draw all the widgets
If we run that we should see the our game look like the original picture, with our widgets all working. We're not updating the HP text or bar as the player takes damage yet though. Let's look at doing that using the Widget system.
Each Widget has a State that is uses to draw. The type of this shape can change Widget to Widget. For example, the ButtonWidget has a text field in its state, while the BarWidget has minValue, currentValue, width, etc. When a Widget is asked to draw to a terminal, it uses this state to figure out what to draw. If we change this state, is will draw for us!
There are two main ways to change a Widget's state. We can either call setState({...}), and pass in a partial state, or we can use setUpdateFunc(() => {...}) to give it a callback to run every frame.
// Example!

// Set the state once, immediately
buttonWidget.setState({text: "Hello World"!})

// On every update, set the state
buttonWidget.setUpdateFunc(() => {
  return { text: Date.now() }
})
We can use this second approach to wire up our widgets so whenever we render we'll pull the values from the state. Let's take a look.
// src/systems/render.ts
//...
const textWidget = new GUI.TextWidget({
      origin: { x: 3, y: 0 },
      initialState: { text: " HP 30/30 " },
    })
      .setParent(panelWidget)
      .setUpdateFunc(() => {
        const player = this.game.player;
        const playerStats = player.getComponent(Components.CombatStats);

        return {
          text: playerStats ? `HP ${playerStats.hp}/${playerStats.maxHp}` : "",
        };
      });

    const barWidget = new GUI.BarWidget({
      origin: { x: 15, y: 0 },
      initialState: {
        width: 15,
        maxValue: 100,
        foreGlyph: Glyph.fromCharCode(
          CharCode.blackSquare,
          Color.Red,
          Color.Red
        ),
        backGlyph: Glyph.fromCharCode(
          CharCode.blackSquare,
          Color.DarkRed,
          Color.DarkRed
        ),
      },
    })
      .setParent(panelWidget)
      .setUpdateFunc(() => {
        const player = this.game.player;
        const playerStats = player.getComponent(Components.CombatStats);

        return {
          maxValue: playerStats?.maxHp,
          currentValue: playerStats?.hp,
        };
      });
//...
  execute() {
    const { results } = this.queries.renderables;

    this.game.terminal.clear();

    this.gui.cascadeUpdate(); // Add a cascadeUpdate! This will call our new methods.
    this.gui.cascadeDraw();
If we run our game now, we'll see the HP bar is full, reflecting the actual state.

We still need to do a bit more work to get UI where we want, and make combat messages appear. Let's start by adding logs for important events that happen in our game. We'll create a class to help with this kind of logging in a new file.
// src/game-log.ts
export class GameLog {
  maxHistory: number;
  logs: string[] = [];

  constructor(maxHistory = 10) {
    this.maxHistory = maxHistory;
  }

  addMessage(...msgs: string[]) {
    this.logs.push(...msgs); // Add any new messages
    while (this.logs.length > this.maxHistory) { // Trim the history
      this.logs.shift();
    }
  }

  getLastMessages(count: number) {
    // Oldest messages are first in the array, we'll reverse it to get the newest.
    // We have to slice the first time to not mutate the original array
    return this.logs.slice().reverse().slice(0, count);
  }
}
Then we'll add this to our game.
// src/app.ts
import { GameLog } from "./game-log"; // Add the import statement!

//...
export class Game {
  input = new Input.KeyboardHandler();
  terminal = this.createTerminal();
  lastTime = performance.now();
  world = new World();
  player: Entity;
  gameState = GameState.INIT;
  map = GameMap.GenMapRoomsAndCorridors(MAP_WIDTH, MAP_HEIGHT);
  log = new GameLog();

  constructor() {
    this.registerComponents();
    const { player } = this.initWorld();
    this.player = player;

    this.log.addMessage("Game Start!");
  }
Finally we'll change our render engine to write the last few lines of logs to the screen. We could potentially write a custom Widget to do this work, but it's just a few lines. It's also good to see how the Widgets can help render your game, but if you use them you're not required to go all-in.
// src/systems/render.ts
//...

    const logs = this.game.log.getLastMessages(5);
    for (let i = 0; i < logs.length; i++) {
      const msg = logs[i];
      this.game.terminal.writeAt({ x: 1, y: 44 + i }, msg);
    }

    this.game.terminal.render();
Next let's add some logging for our combat system. It would be nice to see something like Player attacked Raider for 3 damage. However to make such a log, we'd first need to give each entity a name! Let's do that now, starting with a Name component.
// src/components.ts
//...

export class Name extends Component<Name> {
  name = "UNKNOWN";

  static schema = {
    name: { type: Types.String },
  };
}
// src/app.ts
//...
    this.world
      .registerComponent(Components.Position)
      .registerComponent(Components.Renderable)
      .registerComponent(Components.Player)
      .registerComponent(Components.Enemy)
      .registerComponent(Components.Viewshed)
      .registerComponent(Components.BlocksTile)
      .registerComponent(Components.CombatStats)
      .registerComponent(Components.AttemptToMelee)
      .registerComponent(Components.IncomingDamage)
      .registerComponent(Components.Name) // Register it with ECSY!
      .registerSystem(Systems.VisibilitySystem, this)

// ...
    const player = this.world
      .createEntity()
      .addComponent(Components.Position, startRoom.center())
      .addComponent(Components.Player)
      .addComponent(Components.Renderable, {
        glyph: new Terminal.Glyph("@", Color.Yellow),
      })
      .addComponent(Components.BlocksTile)
      .addComponent(Components.Viewshed, { range: 7 })
      .addComponent(Components.CombatStats, {
        hp: 30,
        maxHp: 30,
        power: 5,
        defense: 2,
      })
      .addComponent(Components.Name, { name: "Player" }); // Add a name for the player!

// ...

    // Update our monster generation to add names.
    // Here we create *most* of the entity up front, then moved
    // the differences to the bottom of the loop
    for (let i = 1; i < this.map.rooms.length; i++) {
      const room = this.map.rooms[i];

      const e = this.world
        .createEntity()
        .addComponent(Components.Enemy)
        .addComponent(Components.Position, room.center())
        .addComponent(Components.BlocksTile)
        .addComponent(Components.Viewshed, { range: 5 })
        .addComponent(Components.CombatStats, {
          hp: 10,
          maxHp: 10,
          power: 5,
          defense: 2,
        });

      const creatureType = rng.nextInt(0, 100);
      const zombieGlyph = new Terminal.Glyph("Z", Color.Red);
      const raiderGlyph = new Terminal.Glyph("R", Color.Red);

      if (creatureType < 50) {
        e.addComponent(Components.Renderable, { glyph: zombieGlyph });
        e.addComponent(Components.Name, { name: "Zombie" });
      } else {
        e.addComponent(Components.Renderable, { glyph: raiderGlyph });
        e.addComponent(Components.Name, { name: "Raider" });
      }
    }
Once we're all set there, let's update our Combat System to now log the attacks!
// src/systems/melee-combat.ts
//...

      const attackerNameComp = attacker.getComponent(Components.Name);
      const defenderNameComp = defender.getComponent(Components.Name);
            const attackerName = attackerNameComp
        ? attackerNameComp.name
        : "An unknown attacker";
      const defenderName = defenderNameComp
        ? defenderNameComp.name
        : "An unknown defender";

      attacker.removeComponent(Components.AttemptToMelee);

      const dmg = Math.max(0, attackerStats.power - defenderStats.defense);
      if (dmg === 0) {
        this.game.log.addMessage(
          `${attackerName} couldn't hurt ${defenderName}!`
        );
      } else {
        this.game.log.addMessage(
          `${attackerName} attacked ${defenderName} for ${dmg} damage!`
        );
        Actions.inflictDamage(defender, dmg);
      }
Similarly, let's update the death system to display a similar message.
// src/systems/death-system.ts
//...

  for (const d of dead) {
    const nameComp = d.getComponent(Components.Name);
    if (nameComp) {
      this.game.log.addMessage(`${nameComp.name} died!`);
    }
    d.remove(true);
  }

Looking at our log though, it's easy to see we never made the enemies attack us! Let's fix the enemy ai system real quick.
// src/systems/enemy-ai.ts
//...

  if (path && path[1]) {
    const nextStep = path[1];
    // next step is the player
    if (nextStep.x === playerPos.x && nextStep.y === playerPos.y) {
      e.addComponent(Components.AttemptToMelee, { defender: player });
    } else {
      Actions.tryMoveEntity(this.game, e, nextStep, true);
    }
  }

Right now if the player dies the game might freeze or crash, but for now let' just focus on the UI. We'll circle back around and add some good win/loss conditions for the game.
The final thing we'll do in this chapter is add a basic cursor for some tooltips. We'll start by adding a new MouseHandler to our game, similar to the KeyboardHandler.
// src/app.ts
//...
export class Game {
  input = new Input.KeyboardHandler();
  mouse = new Input.MouseHandler();
From there, we'll update the render function to get the tile the player is hovering over.
// src/examples/render.ts
//...

    const mousePos = this.game.mouse.getPos();
    const tilePos = this.game.terminal.windowToTilePoint(mousePos);
    if (tilePos.y < 43) {
      this.game.terminal.drawGlyph(
        tilePos,
        Glyph.fromCharCode(CharCode.fullBlock, Color.Gold)
      );
    }

    this.game.terminal.render();
If we try to run it, we can see it kinda working. If you press a key while hovering, you'll see that square change colors. The problem is the render method only gets called after player input right now, as the await in our main loop is causing the game to wait each loop.
Now for some games this might not be an issue, if the UI only updates on player input. But when we want to separate the UI rendering from the input, we need to take a different approach that doesn't rely on await. We'll do that by adding a new AWAITING_INPUT GameState, and changing how we listen to key presses.
// src/app.ts
//...

export enum GameState {
  INIT,
  PLAYER_TURN,
  ENEMY_TURN,
  AWAITING_INPUT, // New GameState!
}

// ...

  constructor() {
    this.registerComponents();
    this.registerPlayerInput(); // Let's add a new function to keep things clean

// ...
  registerPlayerInput() {
    const ctx = new Input.KeyboardContext();
    this.input.setContext(ctx); // Create and set a new context


    // We'll listen for *any* keyUp, and look at the key on the event
    ctx.onAnyUp((keyEvent) => {

      // If we're not waiting for input, ignore!
      if (this.gameState !== GameState.AWAITING_INPUT) return;

      switch (keyEvent.key) {
        case Input.KeyCode.LeftArrow: {
          Actions.tryMoveEntity(this, this.player, { x: -1, y: 0 });
          this.gameState = GameState.PLAYER_TURN; // Change the GameState if a valid input
          break;
        }
        case Input.KeyCode.RightArrow: {
          Actions.tryMoveEntity(this, this.player, { x: 1, y: 0 });
          this.gameState = GameState.PLAYER_TURN;
          break;
        }
        case Input.KeyCode.UpArrow: {
          Actions.tryMoveEntity(this, this.player, { x: 0, y: -1 });
          this.gameState = GameState.PLAYER_TURN;
          break;
        }
        case Input.KeyCode.DownArrow: {
          Actions.tryMoveEntity(this, this.player, { x: 0, y: 1 });
          this.gameState = GameState.PLAYER_TURN;
          break;
        }
      }
    });
  }

// ...

  // take the async/awaits off these functions now!
  tick(delta: number, time: number) {
    // Execute Systems
    this.world.execute(delta, time);

    if (this.gameState === GameState.INIT) {
      this.gameState = GameState.PLAYER_TURN;
    } else if (this.gameState === GameState.PLAYER_TURN) {
      this.gameState = GameState.ENEMY_TURN;
    } else if (this.gameState === GameState.ENEMY_TURN) {
      this.gameState = GameState.AWAITING_INPUT;
    }
  }

  run() {
    const time = performance.now();
    const delta = time - this.lastTime;

    this.tick(delta, this.lastTime);
    window.requestAnimationFrame(this.run.bind(this));
  }
If we try again, we'll see the cursor can now move independent of player input! This is starting to look good, but let's add one more the UI. To help people understand the game a bit better, we'll add a LabelWidget to display whenever we're hovering over an entity. Let's give it a shot.
// src/systems/render.ts
//...

export class RenderSystem extends System {
  game: Game;
  gui: GUI.ContainerWidget;
  labelWidget?: GUI.LabelWidget; // New label widget

// ...

  constructGUI(game: Game): GUI.ContainerWidget {
    const container = new GUI.ContainerWidget().setTerminal(game.terminal);

    // We create a new LabelWidget. It will try to draw whenever we call
    // cascadeDraw on the container now, since we set the parent. However
    // it *won't* draw if the labelWidget is disabled.
    this.labelWidget = new GUI.LabelWidget({
      initialState: {
        text: "Replace me!",
        direction: "right",
        backColor: Color.Gray,
      },
    })
      .setDisabled()
      .setParent(container);

  // ...

  // back where we setup our mouse
  const mousePos = this.game.mouse.getPos();
  const tilePos = this.game.terminal.windowToTilePoint(mousePos);
  const entities = this.game.map.getTileContent(tilePos);
  let labelName = "";

  for (const e of entities) { // Find an entity with a name
    const nameComponent = e.getComponent(Components.Name);
    if (nameComponent) {
      labelName = nameComponent.name;
      break;
    }
  }

  if (labelName) { // If we found a name
    this.labelWidget?.setDisabled(false); // Set the widget to enabled
    this.labelWidget?.setOrigin(tilePos); // Set the widget to the mouse position
    this.labelWidget?.setState({ // Update the text
      text: labelName,
      direction: tilePos.x < 25 ? "right" : "left",
    });
  } else {
    this.labelWidget?.setDisabled(); // No entity found, disable the widget
  }

  // Move these here from the top of the `Execute` function.
  // This ensures our GUI is the last thing drawn
  this.gui.cascadeUpdate();
  this.gui.cascadeDraw();

  // Move the logs after for now, so they draw on top of the UI
  const logs = this.game.log.getLastMessages(5);
  for (let i = 0; i < logs.length; i++) {
    const msg = logs[i];
    this.game.terminal.writeAt({ x: 1, y: 44 + i }, msg);
  }

  this.game.terminal.render();
If we try it out, we'll start to see a label working! We've got a pretty solid base for our UI now, and we can build on it in the next few chapters as we look to add a basic inventory.
